advertisement
Windows 10 2018 update: Key enterprise features
Microsoft is due to release the next major update for Windows 10 in March or April. Rumor has it that…
Pick up where you left off with Timeline
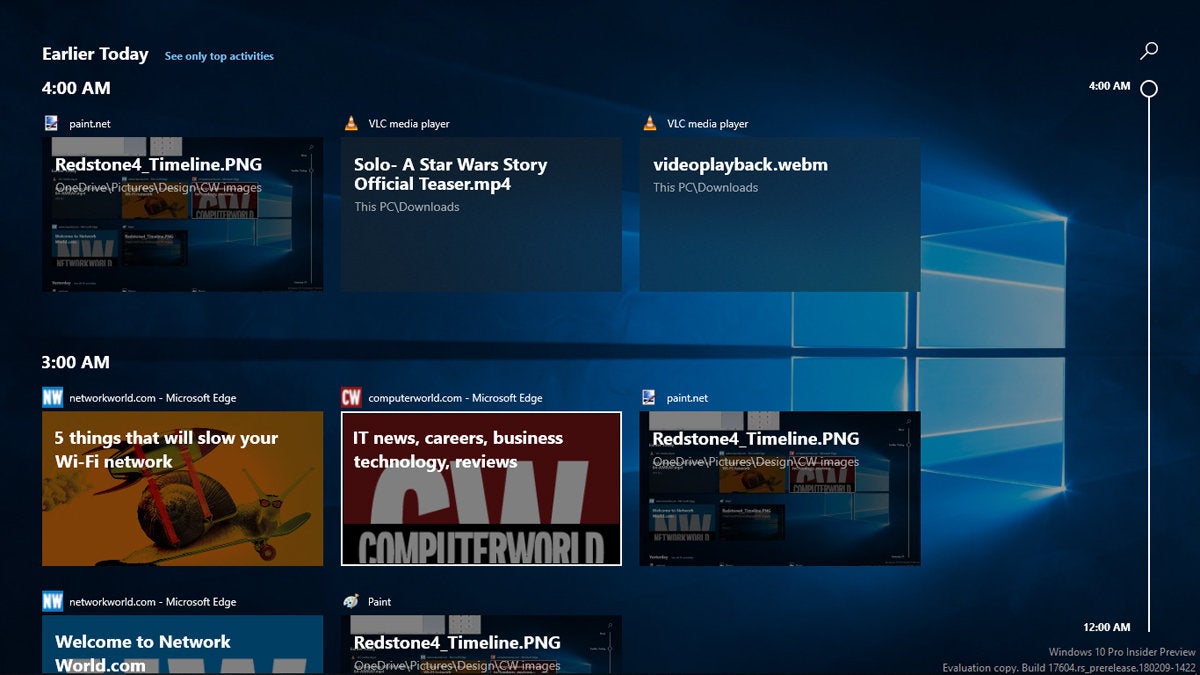
The much anticipated Timeline feature debuts with the this release. It’s part of the Task View tool and takes snapshots of your activities in various Windows apps over time — documents you were working on, web pages you visited, and so on. After a series of these snapshots have been archived by Timeline, you can click the Task View icon and scroll vertically back in time through thumbnails of these past activities, or use the search box to search for a specific activity. Click on any thumbnail, and the appropriate app and piece of content will be reopened.
 HOWARD WEN / IDG
Using Timeline, you can open a snapshot to resume working on something where you left off. Even better, you can do this across different Windows 10 computers if you sign into them with your Microsoft online user account. You could start work on a document in the Word app using your home computer, and then resume writing it on your work computer at the office.
Be aware that Timeline only takes snapshots of Windows apps that have been designed to support it, such as the Edge browser and Microsoft Office apps. Microsoft is encouraging app developers to update their apps to support Timeline.
advertisement
Get a handle on Microsoft’s diagnostic data harvesting
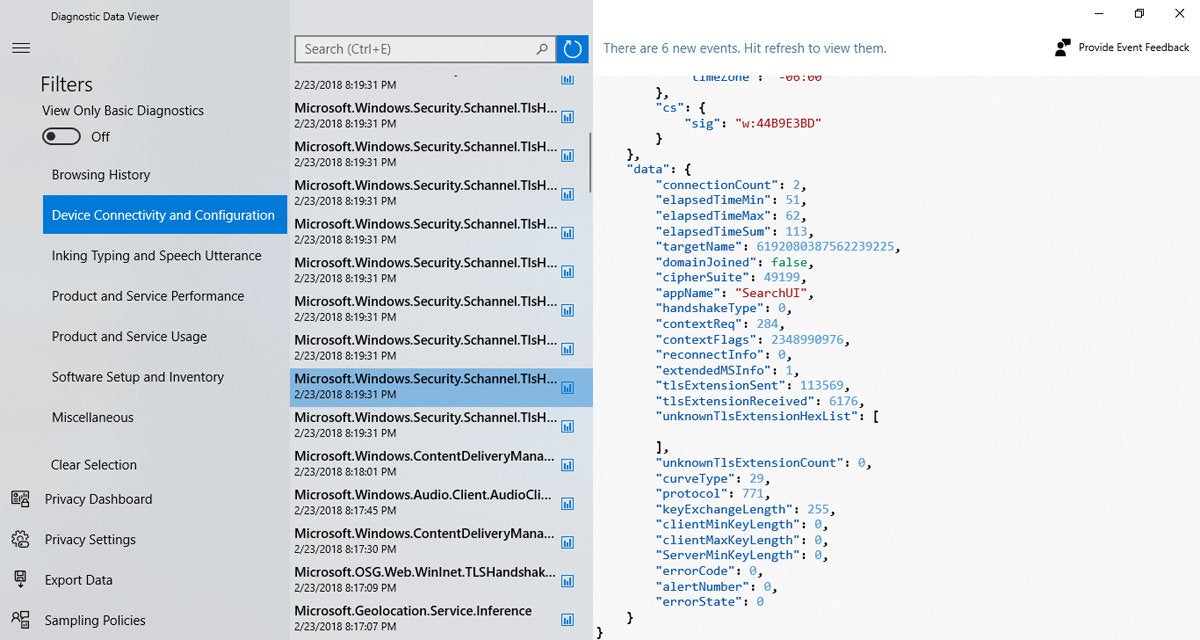
Attempting to alleviate privacy concerns that have been surrounding Windows 10, the Diagnostic Data Viewer shows you the diagnostic information that the OS sends to Microsoft. It also reveals information about your computer’s hardware that is stored in Microsoft’s cloud. All of this is presented in plain text format and is searchable through a search box in the tool.
As of this writing, the Diagnostic Data Viewer software itself isn’t included in the Windows 10 Insider builds, but Insiders who have installed build 17083 or later can download and install it. To do so, launch the Settings app, go to Privacy > “Diagnostics & feedback,” and turn on the “Diagnostic data viewer” option. A “Diagnostic Data Viewer” button will become active — you click it to launch the Microsoft Store app, which then presents you with the tool to download and install.
 HOWARD WEN / IDG
Also on the Settings > Privacy > “Diagnostics & feedback” screen, you’ll find an option to delete all diagnostic data that Microsoft has collected from your device.
advertisement
Share files over Bluetooth
The new Near Share feature lets you send files over Bluetooth to nearby Windows 10 PCs — handy for sharing files in meetings, for instance. All the computers you want to share with must have Bluetooth turned on, must be in Bluetooth range, must have Near Share enabled and must be running the Redstone 4 update.
For in-app use, Near Share works only from Windows apps that support sharing content, such as Photos and Edge. In these apps, when you click the “Share” button, Windows 10 computers nearby that have Near Share turned on will appear on the Share pop-up menu listing the devices that you can share to. In this way you can send an image you’re viewing in the Photos app or the URL for a web page you’re viewing in Edge to a nearby Windows 10 computer.
More useful: from File Explorer, you can use Near Share to transfer any file to another Windows 10 PC. Just right-click the file and choose Share to see the Share pop-up menu described above.
advertisement
Near Share isn’t activated by default — you and anyone you want to share files with have to turn it on first. Click the Action Center icon located at the right end of the taskbar, and on the panel that slides in, click the “Near Share” button.
Enhanced “do not disturb” functions
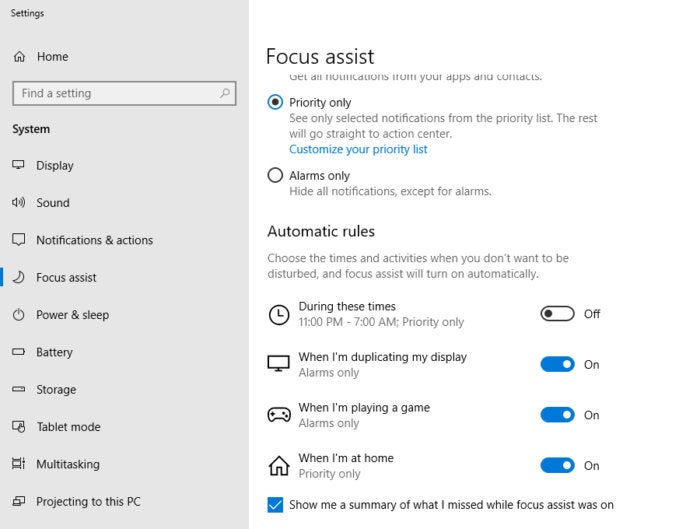
The Quiet Hours feature has a new name, Focus Assist, and an interface you can access from the Settings app. It’s under System > Focus assist. Here you can set automatic rules for times when you don’t want to be disturbed.
 MICROSOFT
Focus Assist has three main settings: Turning Focus Assist off lets all notifications from your apps and contacts through. Selecting “Alarms only” hides all notifications except alarms.
Selecting “Priority only” is the middle path; it allows only selected notifications from your priority list through. You can grant priority to apps, people in your contacts, or phone activities (if you have an Android phone with the Cortana app installed). You can also control when you don’t want to be disturbed by these prioritized notifications: during a time range, when you are at a specified location (like home), or when your PC is set to display its screen on another display (such as when you’re giving a presentation).
You can switch among the three main Focus Assist settings on the fly by right-clicking the Action Center icon in the taskbar and making a selection from the pop-up menu.
Settings app additions and changes
As has been the case with each major Windows 10 update, the spring 2018 update copies a few more settings and functions from areas of the old Windows user interface to the Settings app.
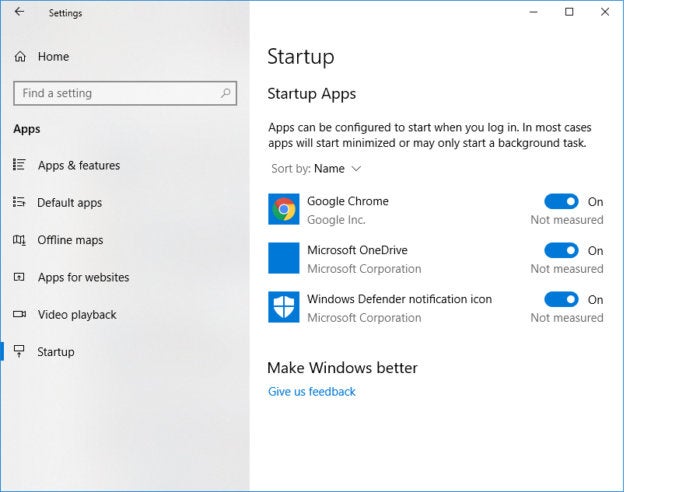
First up is control of startup applications. In the old days, if you wanted to prevent a background application from loading and running when Windows boots up, you had to launch the Task Manager to set this. Now this control also appears in the Settings app under Apps > Startup. This new way is far simpler: simply click the switch to “off” by the name of the app you don’t want to launch at boot-up.
 HOWARD WEN / IDG
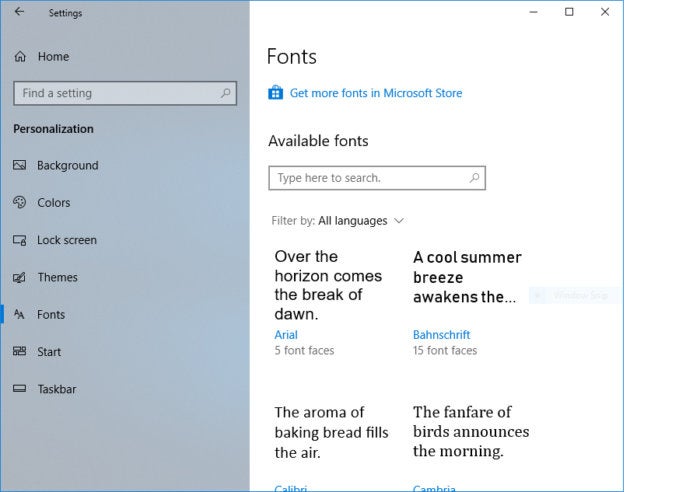
Originally in the Control Panel, font control can also be found in the Settings app under Personalization > Fonts. It shows bigger, clearer examples of your computer’s installed fonts. From this interface, you can click “Get more fonts in the Store” to launch the Microsoft Store app. This takes you to the Store’s fonts section, where you can browse fonts to download and install.
 MICROSOFT
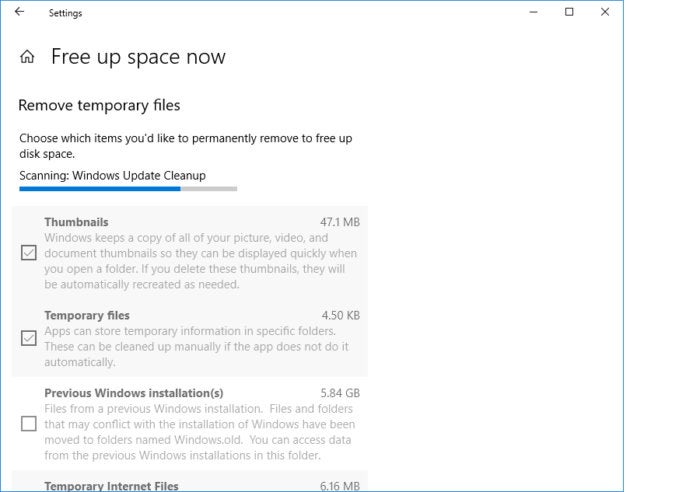
The functionality of the old Disk Cleanup tool is now in the Settings app, too, under System > Storage > Free up space now. (You can still access the original Disk Cleanup. In File Explorer, right-click a drive on your PC (e.g., “C:”) and click Properties from the panel that opens. Click the “Disk Cleanup” button in the next panel.)
 HOWARD WEN / IDG
Windows Defender, the suite of security settings and tools that are built into Windows 10, has been renamed “Windows Security.” It’s listed in the Settings app under Update & Security > Windows Security.
User interface tweaks
Microsoft has also been busy updating three flagship features of Windows 10: My People, Edge and Cortana.
First released in the Fall Creators Update in 2017, My People lets you pin your email and Skype contacts as shortcut icons on the taskbar. Clicking the icon of a contact opens a menu that lets you communicate with that person immediately — for instance, sending an email through the Windows 10 Mail app or initiating a video call through the Skype app. Originally, you could pin up to three contacts on the taskbar; the Redstone 4 update raises this to 10. And its UI now lets you drag and drop to rearrange the order of your contacts pinned on the taskbar.
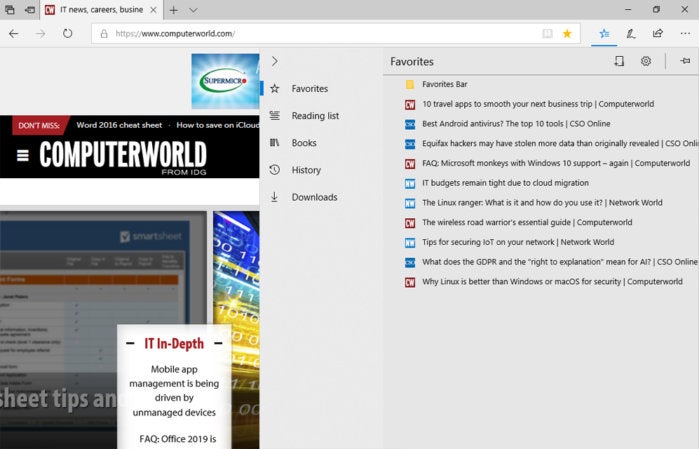
In the Edge browser, there’s a full-screen view button on the toolbar that appears above an EPUB formatted ebook, a PDF, or a web page rendered in the browser’s “reading view” mode. And its Favorites manager has a better UI that makes it easier to organize your saved bookmarks.
 HOWARD WEN / IDG
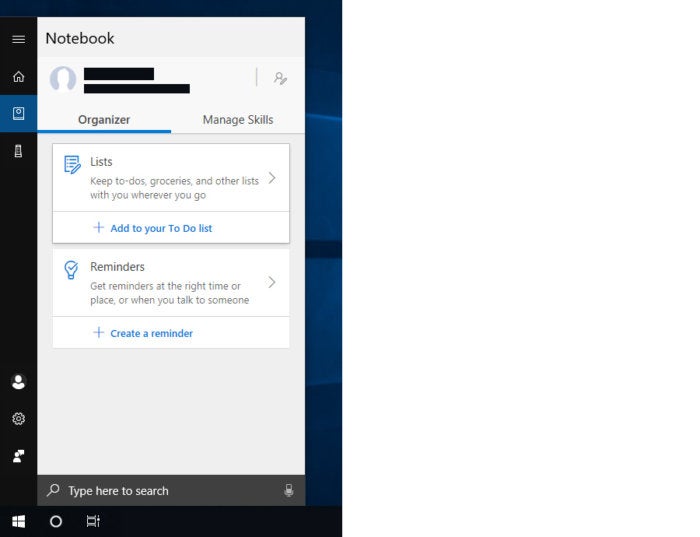
Under its Notebook panel, Cortana has a new Organizer tab that shows your lists and reminders in an easier-to-view format. Cortana’s Collections feature, which suggests links for you to save and group together as you’re browsing the web with Edge, is now part of the Lists feature under this Organizer tab.
 HOWARD WEN / IDG
Password recovery for Windows 10 local accounts
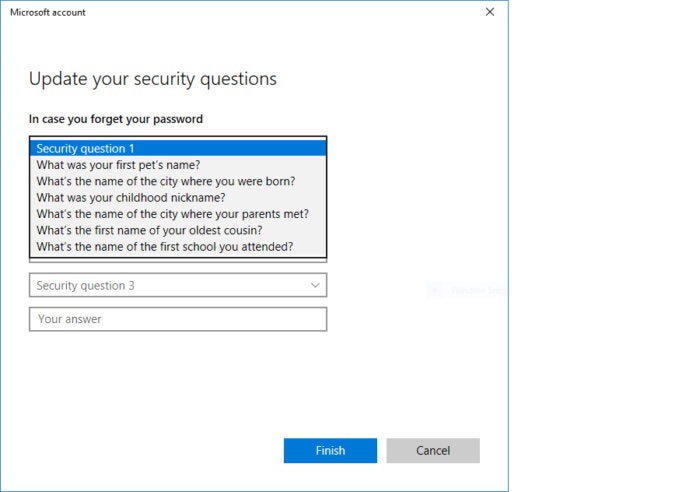
If you prefer to sign in to your Windows 10 computer with a local account (as opposed to a Microsoft online user account, such as an Outlook.com one), you can enable password recovery for it. Launch the Settings app, go to Accounts > Sign-in Options and click “Update your security questions.” Fill in answers to the three questions here. In case you ever forget your password when signing in to Windows 10, you’ll be presented these questions. Answer all three questions correctly, and you will be able to create a new password to sign in to your Windows PC.
 MICROSOFT
Linux command additions
Several new Linux-related items have been added to the Command Prompt. Curl and tar tools for downloading and extracting .tar archives are under the directory C:\Windows\System32\ as curl.exe and tar.exe. The new wslpath command will convert a Linux directory path to its Windows version. There are many other additions of a highly technical nature; most apply to developing and running Linux code under Windows 10. You can read about them in greater detail at Microsoft’s Windows Command Line Tools for Developers page.
Manage bandwidth under Group Policy
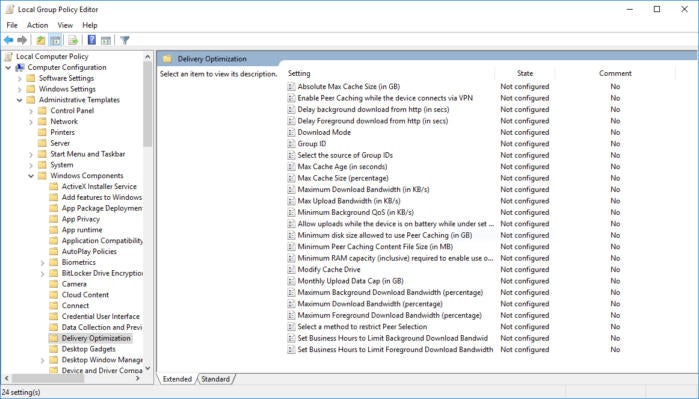
Attention admins: New options have been added to the Group Policy tool for you to control the bandwidth used by Windows Update and by Windows apps automatically updating themselves. One option includes throttling the amount of bandwidth used based on time of day. To access these settings, launch the Group Policy Editor and go to Computer Configuration > Administrative Templates > Windows Components > Delivery Optimization.
 MICROSOFT
Key enterprise features in the Windows 10 Fall Creators Update
Microsoft released the the Windows 10 Fall Creators Update (version 1709), its most recent major update to the OS, on October 17, six months after the Creators Update (version 1703) was released. Most of what the Fall Creators Update adds to the OS is under-the-hood features — some new, some revised, and many related to security. Here are some improvements that enterprise users and IT pros should know about.
Better OneDrive file management
In previous versions of Windows 10, OneDrive appeared as a folder in File Explorer. When you put files into the OneDrive folder while signed into Windows 10 with a business or personal Microsoft account, they were uploaded to the cloud. If you signed into another Windows 10 computer with this same account, the files in your OneDrive folder were downloaded to that computer.
Having access to your files from any Windows 10 device is handy, but this automatic syncing behavior wasn’t always convenient if your device was connected to a spotty Wi-Fi signal or was low on storage space. That said, you could limit syncing to certain folders within your OneDrive, but anything within those folders was synced.
What’s more, if you had folders and files stored online only, they didn’t appear in your OneDrive folder in File Explorer. To see them, you had to right-click the OneDrive icon in the notifications area of the taskbar and choose “View online” from the pop-up menu; your default browser opened to your cloud OneDrive.
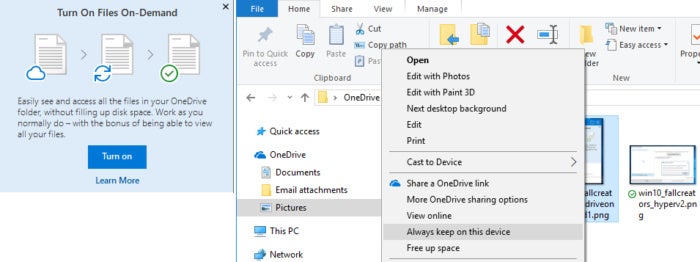
OneDrive in the Fall Creators Update introduces a feature called OneDrive Files On-Demand that’s designed to smooth out OneDrive’s functionality. It lets you set OneDrive so it won’t forcibly sync files stored in the Microsoft cloud to the Windows 10 device you’re currently using, and you don’t have to launch a browser to access online files.
Instead, there are placeholder shortcuts for online files in your OneDrive folder in File Explorer, but the files themselves are not on the device you’re using by default. If you double-click one of these shortcuts, the file it represents will then be downloaded and saved to the device. You can change a downloaded file back to an online-only file by right-clicking it and selecting “Free up space.” And you can mark certain files as “Always keep on this device” if you want them to be permanently available when you’re offline.
 HOWARD WEN / IDG
For SharePoint Online teams that collaborate on files online, OneDrive Files On-Demand can help to reduce bandwidth usage, because files won’t be downloaded or re-downloaded on all synced devices whenever a new file is added or a change is made to an existing file in the team site.
EMET-style exploit protection
Introduced in 2009, Microsoft’s Enhanced Mitigation Experience Toolkit (EMET) is a free tool that recognizes security flaws in Windows systems and attempts to prevent malicious code from exploiting them using a variety of techniques. Mainly geared for enterprise use, EMET was for many years a valuable tool for IT pros in protecting user systems. But with Windows 10, Microsoft began baking better security protections into the operating system, rolling out major updates more frequently, and urging its customers to move to the new OS rather than use EMET with an older version of Windows. Although you can still install and run EMET on Windows 10, Microsoft has officially retired it, with an end-of-life date of July 31, 2018.
However, many of EMET’s threat protections have been reborn in the Fall Creators Update as Windows Defender Exploit Guard. It is part of Windows Defender Advanced Threat Protection, Microsoft’s enterprise security service. With Exploit Guard in place, threats like dangerous Office macros or websites that are spreading malware will be blocked.
Windows Defender Security Center, the all-in-one security dashboard that was introduced in the spring 2017 Windows 10 Creators Update, has also been upgraded in the Fall Creators Update to include EMET-style exploit protection.
Ransomware protection
High-profile ransomware infections such as WannaCry spreading throughout the world’s computers and holding users’ files hostage have made the news recently. Although most of the affected systems were running older versions of Windows, Microsoft is hardening protections against ransomware in Windows 10.
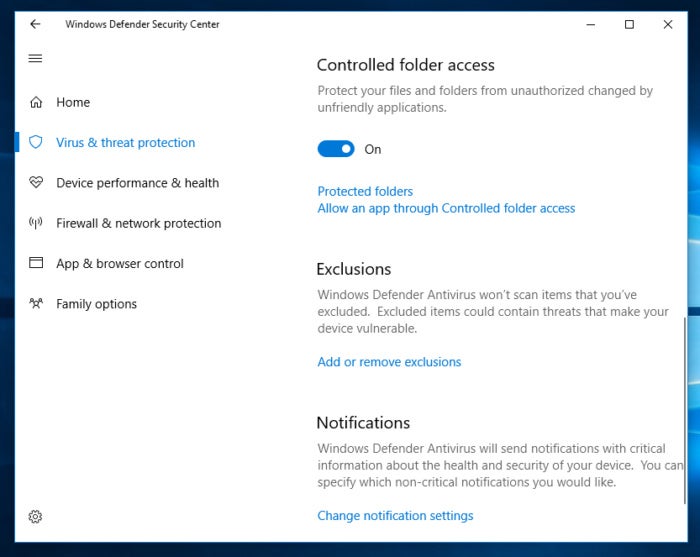
A new feature in the Fall Creators Update is designed to prevent such malware from locking up users’ personal files. The Windows Defender Security Center has a switch called “Controlled folder access.” When it’s turned on, only whitelisted apps are able to access and change files in the Desktop, Documents, Music, Pictures and Videos folders. Should an app that hasn’t been approved try to access these folders, Windows 10 will send an alert.
 HOWARD WEN / IDG
Virtual machine protection for Edge
Windows Defender Application Guard for Microsoft Edge is a new security feature in the Fall Creators Update aimed at keeping computers safe from zero-day attacks and other malware. It is available only for computers running Windows 10 Enterprise Edition and Hyper-V.
With Application Guard enabled, the Edge browser runs normally when the user goes to a trusted site such as an internal application. But when the user goes to an untrusted or unknown site, Application Guard will launch Edge inside a virtual machine — essentially, a new instance of Windows that’s isolated from the user’s normal operating environment, including memory, local storage, other applications, stored credentials, network endpoints and so on. (Trusted sites and related security settings can be set by an administrator.)
If malware attempts to harm the computer or office network by going through Edge, it probably won’t be able to cause damage because it will be confined within the VM. When the user ends the session, the VM container and any malware in it are discarded.
One-click communications
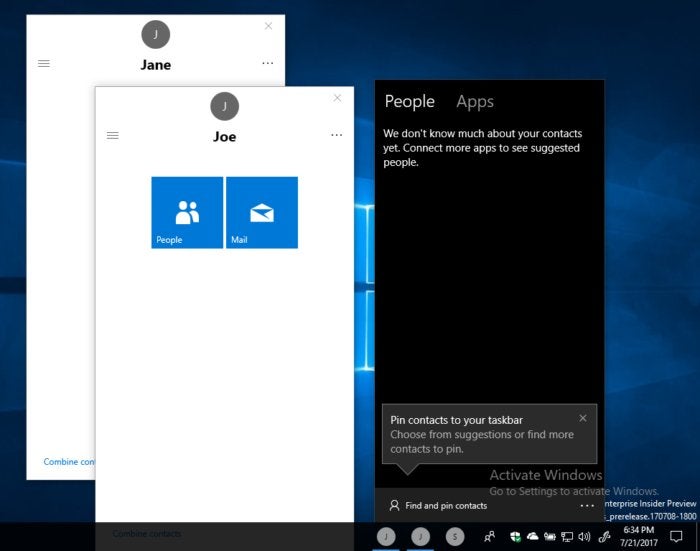
This social messaging and sharing UI was supposed to be included in the Creators Update, but wasn’t ready in time for that release. My People helps you conveniently communicate with people in your contacts list by letting you pin icons for certain contacts (which could be their headshots) to the taskbar. Just click a contact’s icon to communicate with that person through email, instant messaging or video chat. (Taskbar pinning is currently limited to three contacts.)
 HOWARD WEN / IDG
My People requires you and the contacts you wish to pin to have the Windows 10 apps Mail, People or Skype; when you initiate it, it will surface people in your contacts list who have those apps. To activate My People for the first time, launch the People app; to access My People after it’s been activated, click its icon in the notifications area of the taskbar.
A quick fix for blurry desktop apps
Sometimes when an older desktop app is shown on a large display with a high resolution, its text and graphics appear blurry. And many desktop apps can become blurry after users dock or undock their laptops, move an app window between displays with different resolutions, or remote into one device from another device with a different display resolution.
Getting apps that become blurry after docking/undocking or otherwise changing the resolution to become crisp and clear again generally requires rebooting Windows. The problem with legacy apps on hi-res displays can sometimes be fixed by manually tweaking the Compatibility settings for the problematic app, but Windows sometimes requires a restart for the changes to take hold. Either way, it’s an inconvenience and a productivity hit for users.
The Fall Creators Update does away with this hassle, helping to maintain system uptime. All the user needs to do is shut down the desktop app and relaunch it for the crisper rendering to take. It should be noted, though, that this feature may not work on all desktop apps, and it won’t work on apps that appear blurry on a second monitor that’s been set as the “extended” screen to the primary monitor.
GPU tracking in the Task Manager
The Task Manager, an old-school tool for troubleshooting Windows and keeping tabs on its performance, adds a new trick in the Fall Creators Update: It shows the status of the computer’s graphics processing unit processes on its Performance tab. It also lists the GPU’s memory size and current usage, driver version, the version of DirectX that it’s running, and where the processor is physically located on the computer’s motherboard.
Applications used to view or create graphically rich content — such as animated presentations, videos, and documents or spreadsheets with 3D charts — could be relying on the GPU, and being able to check its status can help diagnose issues with a computer’s overall performance.
Windows Update bandwidth limit
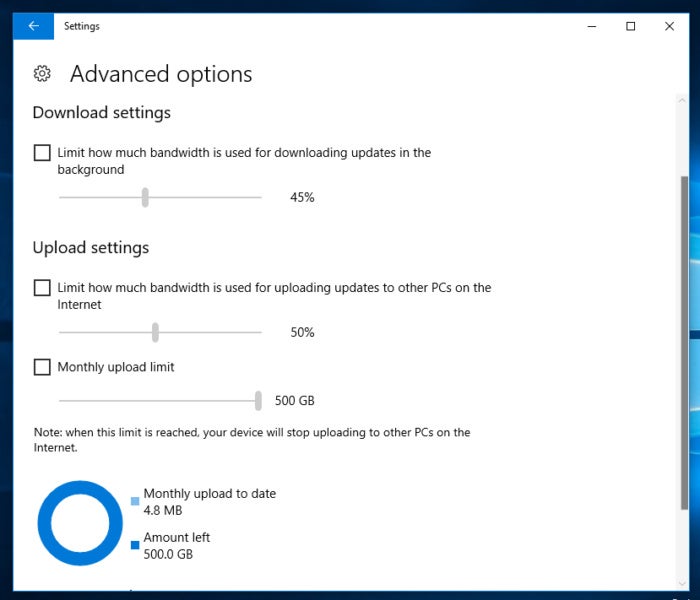
This feature should be useful for network administrators: the ability to limit the amount of bandwidth that Windows Update can use to automatically download updates for Windows 10, or share update files with other computers over a local network or the internet.
The option is listed in the Settings app under Delivery Optimization > Advanced options. There are three sliders. The first two let you adjust the amount of bandwidth data that Windows Update can consume during downloads and uploads, ranging from 5% to 100%. The third slider caps the total data that Windows Update can upload per month, from 5GB to 500GB.
 HOWARD WEN / IDG
Power throttling for background-running apps
To extend the battery runtime of laptops and other mobile devices running Windows 10, the Fall Creators Update throttles the system usage of apps running in the background. If a user is interacting with an app or if an app such as a video player is running in the foreground, Windows should recognize this activity and prioritize system resources for it. Otherwise, it will put opened apps that aren’t being actively used, or system executables that normally run without user interaction, into an energy-efficient mode that will help the battery last longer — a change that business travelers will welcome.
The power-throttling feature currently works only with Intel Skylake and newer processors. Microsoft says it plans for throttling to support other processors in the future.
New device deployment features
Released on June 29, Windows AutoPilot lets IT managers set up customized system configurations (including installed apps) to be deployed from the cloud onto their organization’s Windows 10 computers and other devices. An employee can take a brand-new computer out of the box, turn it on and connect it to the office network — and the device will be automatically configured to the organization’s requirements.
The Fall Creators Update adds a few new capabilities to Windows AutoPilot: self-service deployment for Active Directory domain-joined devices and automatic enrollment in Microsoft Intune, the ability to assign a system configuration to a specific employee, and a resetting mechanism for Windows 10 devices that have already been configured through AutoPilot.
Install a virtual machine locally
For users running Windows 10 Professional or Enterprise and Hyper-V, the Fall Creators Update offers an easy way to install a virtual machine from an .iso or .vhd/.vhdx file that’s stored on your computer. From the Hyper-V Manager, choose Action > Quick Create to launch the Create Virtual Machine panel. There, clicking the “Local installation source” button lets you load a virtual machine image stored on the computer.